RETURN TO SECOND SEMESTER ASSIGNMENTS or RETURN TO ADV. PHOTO ASSIGN
STUDENT FLASH AND SLOW SHUTTER FLASH EXAMPLES
DIGITAL FLASH ASSIGNMENT!
What to do:
Submit two photos taken using your camera’s flash.
•One photo will be “standard” flash.
•The second photo will be shot using a slow shutter speed and flash.
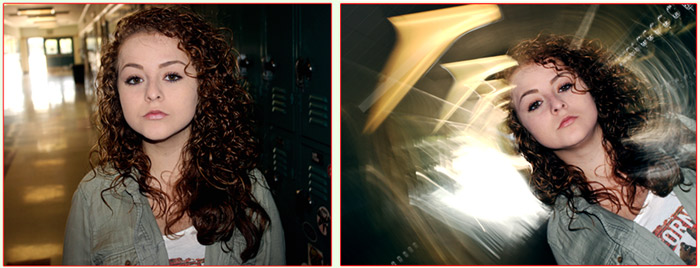
FLASH TECHNIQUE #1 -STANDARD FLASH
•Set your ISO to 100 or 200.
•Put the camera exposure setting on “P” mode..
•Press the flash button on the side of the DSLR to raise the flash.

•Put your subject in a somewhat well lit area, (but not out in the direct sun!).
•Shoot your subject using the camera’s flash.
•You will see evidence of direct on-camera flash, such as hard shadows (and sometimes flash reflections)

FLASH TECHNIQUE #2 -SLOW SHUTTER & FLASH (FLASH BLUR)
•Set the ISO on 100 or 200.
•Use “AV,” mode on the camera.
•Pick a big number fstop like f/11 or f/16

•Make sure the flash is set to 2nd curtain sync.

•Put your subject in dim light, zoom the camera lens, or turn the camera, or shake the camera while you shoot using the flash.
•You should see evidence of using the flash with slow shutter speed -streaks of light in the background.

Tips to help you with the slow shutter & flash/blur technique
•Shoot a lot of photos of the slow shutter flash technique!
•Make sure your subject is in a DIMLY LIT area with lights only in the background.
•Zoom the lens, or rotate the camera when you shoot.
•Be careful not to “drag” the background lights over your subject’s face!
•Get close to your subject! (only head and shoulders/torso –no feet!)
How to submit your flash photos:
Pick one “regular” flash and one “slow” flash image from you shoot.
Put your photos on separate Photoshop backgrounds.
Give the background a color.
Put your name, period # and “flash” on each background.
Put a border around the photos.
Save your images as: p#lastname_flash01 & p#lastname_flash02.
Put your two photos in the correct p#flash folder in the 206 Teacher server. |
